Wednesday, July 29, 2009

Christmas in July: Heirloom Tomato and Fresh Mozzarella Salad, Vegetable Napolean, and Tomato "Caviar"

A sampling of the week's bounty with the addition of the fresh mozzarella...

Heirloom Tomato, Fresh Mozzarella, and Basil Salad
A simple and timeless classic...


It doesn't get much easier than this.
Slice tomatoes, mozzarella, and chiffonade basil.
Sprinkle with salt and pepper, drizzle with white wine vinegar
and olive oil and you have a meal - or the perfect beginning to one.
Serve with lavosh crackers, crusty artisan bread, or just a fork!
Tomato Caviar

Tomato caviar is essentially the seeds and their gelatinous coating. It is used when a tomato flavor is desired but a more delicate approach is needed. It is also a great way to offer a vegetarian alternative to caviar while maintaining the visual component. Remove the outer skin and serve atop blinis with creme fraiche.


Vegetable Napolean with New York Strip Steak


Although I'm not a vegetarian, I do tend to eat like one (and blog like one). So in an effort not to leave out the carnivores, I prepared a NY Strip (Ribeyes are a great alternative - and possibly my favorite) with a vegetable napolean. For the napolean; Oven roast red peppers at about 475 degrees (grilling is even better). While the red peppers are roasting, thick slice the other vegetables - eggplant, squash (cut on the bias = at an angle so that the slice is longer), and heirloom tomatoes. Marinate the eggplant and squash in a little soy sauce, balsamic vinegar, olive oil, salt (not too much because the soy is salty) and pepper. When the peppers are charred mostly black remove from the oven and turn the heat down to 375. Place peppers in a different dish and cover with a lid or plastic wrap to allow the peppers to steam. In about five minutes the skins should come right off, remove seeds and skins and cut into 2-3 inch wide strips. Drain marinade off of the eggplant and squash and roast in a baking dish or sheet tray in a single layer for ten minutes. Remove from oven and let cool for handling. When cool enough to handle stack and layer the vegetables including the red peppers and tomatoes with fresh mozzarella, feta, or your favorite cheese. When you are ready to serve them reheat in the oven until the cheese begins to melt and serve alongside a seared or grilled steak of your choice. This may seem time consuming but is rather quick and the napoleans can be made a day in advance or cooked on the grill for an excellent grill kissed flavor.

Roasted Vegetable Salad

Make this salad using the same technique described above for the napoleans. Rather than stacking the vegetables cut into chunks and drizzle with vinegar and oil, salt and pepper, and add basil or another favorite fresh summer herb. The salad in the picture is made with fresh mozzarella, but would be wonderful with feta or goat cheese.
Have Fun and Enjoy Savoring the Summer Flavors!


Wednesday, July 15, 2009

Computer Crash with a side of Panzanella


Well it has been a little trying of late with regards to posting. My computer crashed and without having a dedicated computer I am limited by time constraints and lines at my apartment's media center - which means less posting for now. However, my saving grace is my new friend and amazing food photographer Ben Pieper - www.benpieperphoto.com who is now photographing my creations. Lucky for all of us because Ben has the eye, skill, and culinary knowledge to translate the beauty of this local bounty into mesmerizing images. I make and style the food and Ben works his magic behind the camera. Check out his website... For this week I am posting on Panzanella - or bread salad. From my CSA I've used green beans, cherry tomatoes, walla walla onions, and basil. The French Farm bread comes from local artisan bakery, Farm to Market, and is available in most grocery stores including every Hen House. To make this easy and tasty recipe gather:

Green Beans with stem ends snapped
Cherry or other large heirloom tomatoes cut into chunks
Walla Walla or Red Onion (or any sweet onion will do) shaved as thin as possible
Good Artisan Bread from Farm to Market or Fervere torn into chunks (about an inch in size), toss the bread in olive oil and toast in an oven at 400 degrees until just toasted on the outside and the inside is tender.
Basil Chiffonade
Red or White Wine vinegar or Balsamic (White Balsamic is better but either will do)
Olive Oil
Dijon Mustard
Fresh Mozzarella (optional)
Cured Meats (optional)
Salt and Pepper
See instructions below:


Some items from my CSA.


Hand crafted hearth baked French Farm Bread from Farm to Market.
To Prepare:
Blanche Green Beans then cool in ice bath. Cut tomatoes in half and place in mixing bowl, add basil chiffonade, and cooled green beans, add diced fresh mozzarella and cured meats. In a smaller mixing bowl, blend 1 TBSP dijon with 1/4 cup olive oil and a few splashes of the vinegar. Mix well and stir (gently) into vegetables. Add bread chunks just before serving. This can be served as an entree salad or as a side. And is a great base for other veggies such as summer squashes.
Enjoy


Monday, June 15, 2009

Spring Rolls

Week 5 of My CSA Share

Strawberries, flat leaf parsley (also called Italian parsley), carrots, 2 types of zucchini, 2 heads of lettuce - the red speckled is a type of romaine and is named Forellenschluss which means speckled like a trout, tatsoi, rainbow chard, and sugar snap peas...


Making spring rolls can appear to be a daunting task, but with just a little practice can be a quick and healthy meal for one or the family. They also make beautiful and inexpensive appetizers for parties. The rice wrappers and rice vermicelli noodles can be found in most grocery stores or for a more interesting experience pick up these items at an asian market!! At the end I'll include a quick peanut sauce recipe to accompany the spring rolls or you can purchase a prepared peanut sauce when you buy the wrappers and noodles.


Ingredients to gather: to make about ten whole spring rolls which will be cut in half to serve.
1 package rice paper sheets
1 package rice vermicelli noodles (sometimes called cellophane noodles)
2-3 small Carrots
1 small beet (optional - it adds amazing color)
1 head asian green such as Tatsoi, Bak Choi, or Vitamin Green
12 Mint leaves
1 bunch Cilantro


Bak Choi, Mint, and Cilantro


Rice vermicelli noodles, rice paper wrappers, beet, Carrot.


In a sauce pan or stock pot bring about 4 cups water to boil, add noodles. These noodles cook very quickly. In about 2-3 minutes check for doneness by pulling one and tasting it after it cools. When noodles are cooked remove from heat and rinse.


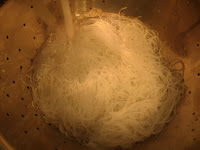
Rinse noodles using cold water to stop them from cooking any further. Move them around with your hands to ensure that they get well rinsed. Drain thoroughly and transfer to a large bowl. Add a little oil to prevent the noodles from sticking together. Again mixing with your hands or tongs to ensure the oil is dispersed throughout.


For the beet cut off the top and bottom.


Peel Carrots and beets and shred them with a hand held grater or food processor and transfer to separate bowls.


Shredded beet and Carrots.


Chop Mint and Cilantro mix together and transfer to a bowl.


Chop asian greens into ribbons and transfer to a bowl. Pictured here is Bak Choi.


Now gather all the bowls of ingredients plus a pan for warm water and set up an assembly line.


Add warm water (as hot as you can comfortably handle) to the pan (this will have to be refilled with warm water once or twice). Place one sheet of rice paper in the water until it is thoroughly softened.


Remove rice paper and set on your work surface.


Add a handful of noodles. You will have to experiment with the right quantity. Too much will make them hard to roll. Too little will make them flimsy, and they will fall apart easily.


Add a little of each ingredient.


Pick up the end of the wrapper closest to you with thumb and index finger. Pull it up slightly at the same time take the ring and pinky fingers and guide the ingredients toward you and pull the wrapper taut. This too will take some practice as to feel how taut to pull without ripping the wrapper. Fortunately many come in the package and cost about $2... so a little learning curve does not break the bank.


Fold the wrapper over the filling that you have just pulled toward you and while keeping the roll taut, roll it over just a little more. You can release now because the rice paper will stick to itself a bit. At this point you could add some cooked shrimp for a variation.


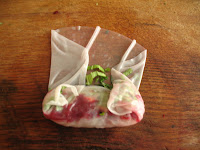
Fold over right side.


Then the left. Pull it taut again and complete the roll.


Completed roll. Let it rest for a moment and cut in half either straight across or on the bias (at a diagonal).


I am terribly sorry for this photo. It does not do the roll justice. My batteries ran out and there was no time for replacing - so this will have to do. If you have some pea shoots stick them into the open ends for a lovely finish. Serve with peanut sauce and lightly blanched snap peas for a yummy healthy meal.


For a quick peanut sauce blend 1/4 cup peanut butter (I like the organic/natural others have hydrogenated oil in them) couple tablespoons soy sauce, juice from half a lemon, a tablespoon of honey and stir slowly whisk in warm water until the desired consistency is achieved. Salt and pepper to taste. Add Sriracha for some heat if you can take it!!!

Wednesday, May 27, 2009

CSA Week 3: Grilled Asparagus Soup with Dill Creme Fraiche

This is a springtime favorite, grilling the Asparagus adds another layer of flavor while adding lemon juice and zest brightens up the earthy Asparagus. It is very simple to make and has several variations like adding cream to make a bisque or if you do not have access to a grill roasting or blanching will also do (I would, however, recommend roasting over blanching for more flavor). Keep in mind that the ingredient quantities are not set in stone if you don't have a shallot, fine. If you have a white onion, fine. If you want to make a large batch to feed your friends - double it. I always try to use whats in my fridge and on hand so no good vegetable goes to waste. I also use extra onions in lieu of stock when I don't have it. Caramelizing the onions makes up for the flavor gained from using veggie or chicken stock. I welcome any questions or comments...

Ingredients to gather: Feeds 2 as a lunch entree or 4 as an accompaniment.
8 Asparagus Spears
2 Spring Onions
1 Green Garlic stalks
1 Shallot
1 Red or Yellow Onion
1 Lemon
Few sprigs of fresh Dill
2 Tablespoons Butter (optional)
Couple dollops of Sour Cream
Grapeseed Oil (or oil of your choice, I prefer Grapeseed)
Salt and Pepper


Items from my CSA share:
Asparagus, Spring Onions, Green Garlic, Dill


Extra items I had in the pantry:
Red Onion, Shallot, Lemon


Step 1: Grilling the Asparagus
Cut the tough bottoms off the Asparagus


Place in dish or tray and drizzle generously with oil, salt, and pepper and mix thoroughly to make sure each spear is well coated with oil. I use my hands, they are less damaging then tongs or other utensils and I can feel the oil distribution.


Heat grill to medium-high heat and place Asparagus on grill.


After a couple of minutes you will need to turn them by taking your tongs and rolling them over. No need to pick each one up just roll one or several at a time.


After a few more minutes pull them off the grill. Remember the small ones will cook faster so they are the first you should turn over and the first to be removed. The Asparagus should have some dark grill marks on them and they should have a little give but not be totally limp. The Asparagus will continue to cook for a little bit after pulling them off the heat. Make a few extra if you have them for hungry snackers...

Step 2: Preparing the Green Garlic and onions


Slice the ends off the Green Garlic and Spring Onions (I accidently deleted my green onion pic) and slice the lower white portion into coins. Set aside.


Slice the each end off the red onion.


Make a shallow slice across the onion (perpindicular to the ends that you just cut).


And peel the outer skin off the onion.


Cut the onion in half,


then in half again


Hold the two quarters together and slice beginning at the bottom closest to the cutting board and working to the mid point at the top. At this point move the cut onions away and turn the remaining quarters around and repeat until finished.


Sliced onions.


For the shallot cut the ends off and peel like the red onion but slice into coins similar to the green garlic.


Mix all onions together.


Step 3: Combining the ingredients
Place medium soup pot on the stove on medium heat or just above. Add a tablespoon of cooking oil and a tablespoon of butter (or 2 Tbsp of oil and no butter) plus salt and pepper and sautee all the onions and the Green Garlic until soft and semi-translucent. While the onions are cooking follow the steps below...


chop the Asparagus, reserving a few tops for garnish.


Using a microplane (on my wish list) or the small grate on a hand grater, grate the entire lemon, then cut into quarter sections.


When the onions are softened add the chopped Asparagus and most of the lemon zest reserving some for garnish.


Squeeze the lemon wedges into the soup, if you want a less tangy soup use only half. I like mine tangy so I use it all. Be careful for the seeds. You may want to use a strainer just in case. I strain it through my fingers - in which case you will inevitably be reminded of some forgotten paper cut...


At this point add enough water or stock of some sort to just cover the ingredients, bring the soup to a boil for a few minutes then turn it off. Using an immersion blender or regular blender, finely puree the soup until completely smooth.

Step 4: Garnishing


Dill, sour cream, lemon zest


Mix sour cream, a little zest and about a teaspoon of lemon juice with a tablespoon or so of Dill until smooth and creamy. This is not a true creme fraiche, however the lemon adds a tanginess similar to that of creme fraiche.


Put creme fraiche in a squirt bottle (a ziploc bag with a very small section of the bottom corner cut out works as well) and zig zag the cream over the top of the soup.


Drag a toothpick or skewer over the cream in the opposite direction in order to create the design on the soup. Add the reserved Asparagus tips and sprinkle with any remaing zest.


Step 5: Eat, Savor, Nourish...